Search...
Overview

The ORIGIN team received a client request for assistance in transitioning from CAD to BIM. In doing so, he wanted us to create a fully-fledged Revit details library for future use in drawings.

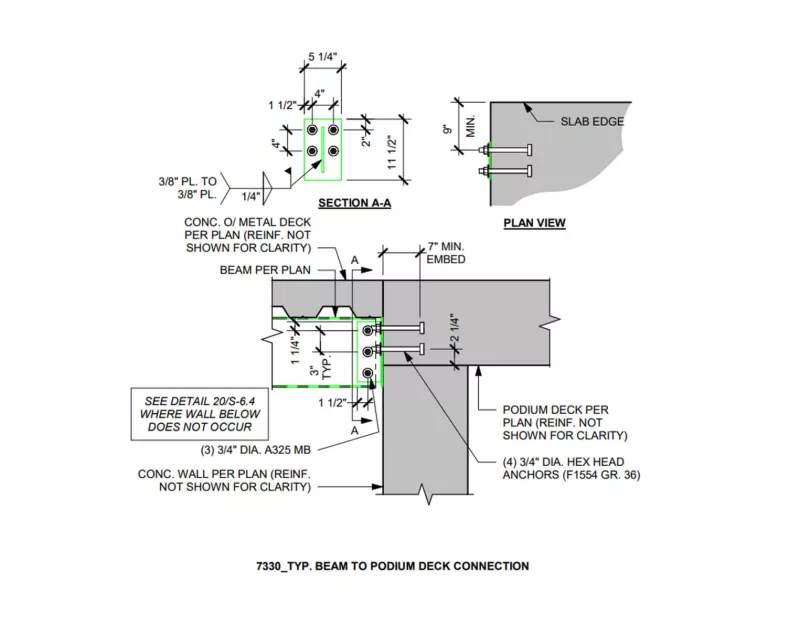
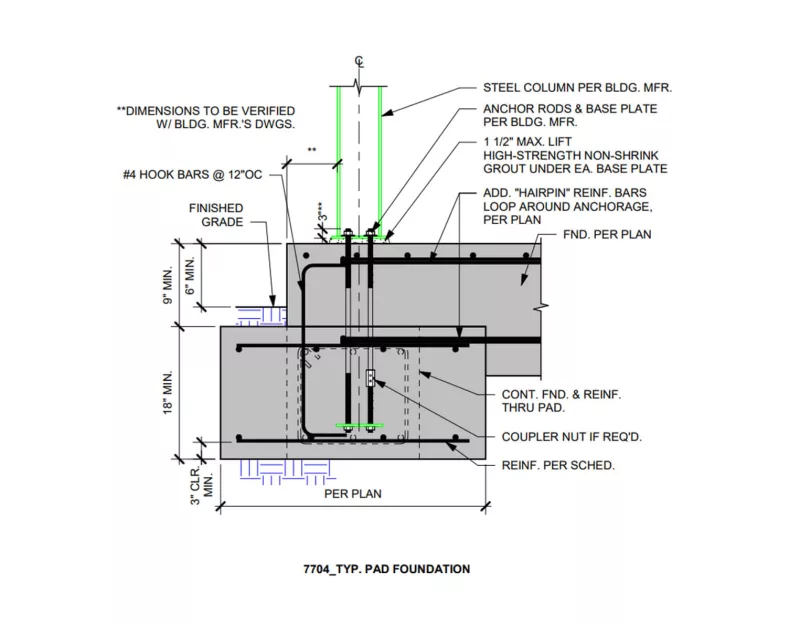
The project scope covered a broad spectrum, incorporating wood and roof framing, steel structures, masonry, foundation, and concrete details. Additionally, our client had various drafting standards we had to follow, covering arrow locations, uppercase text usage, rules for bold and italic text, drafting rebar sizes, and existing elements, to name a few.

In addition, the client wanted us to adhere to an established BIM management system and align with their preferred approach to detail drafting.

Thanks to rich industry knowledge and expertise, we quickly grasped his vision and seamlessly integrated our work into his process, ensuring full alignment with client’s values and utmost client satisfaction with the results.

Input:

  • CAD files with sets of details
  • Requirements for drafting standards

Project deliverables: A comprehensive Revit library of 750+ detail views.

Services: BIM, STRUCTURE
Subservices: PDF/CAD to BIM conversion
Industry: Mixed-use
Object type: Mixed-use
Scope of work: 750+ Detail views
Tools used: Autodesk Revit
Share:
Project stages
1. Input analysis and identification of potential bottlenecks
2. Drafting standards review
3. Revit family library updates
4. Details drafting
5. QC of created details and delivery to the client
1

Step 1 — Drafting standards

Our project began with reviewing a set of specific drafting standards our client sent to us to follow.

As we delved into the project materials, we encountered numerous new potential standards or aspects that needed further clarification with the client. Therefore, we regularly compiled lists of our suggestions for new rules or exceptions in specific scenarios.

As a result, the detail drafting process took a couple of months overall as we had to not only redraft details but also create all necessary Revit families and communicate with the client regarding specific standards.

Step 2 — Revit families updates

During this stage of the process, we combined several sources to create Revit families at an accelerated pace. For example, in addition to the Revit family library provided by our client and Revit detail items created by ORIGIN experts, we incorporated families sourced from the internet that met quality standards. We also utilized the suitable families from the Simpson Strong Tie official plugin.

1
1

Step 3 — Detailing

As we moved forward with the project, we used detail items to design details and create parametrized ‘Detail Items’ Revit families.
This approach enabled us to achieve a range of benefits over drawings created by lines or CAD imports. For example, it gave us the flexibility to modify any part of the detail to suit project specifics and easily copy any detail parts to create new details. On top of that, it ensured consistency between the dimensions of elements and their annotations, which was vital for the overall BIM approach.

While our chosen detailing approach initially required some extra time, it ultimately demonstrated both time and operational efficiency during the later stages of the current project lifecycle and set a foundation for the efficiency of any future projects.

In total, we created approximately 770 detail views, categorized into 6 sets, each containing between 25 and 200 detail views. As a result, the Revit library included the sets of foundation, wood framing, roof framing, steel, masonry, and concrete details.

Construction unit drawings examples
Benefits
The significant value of highly efficient BIM approaches resulting in project time reduction wherever the details are used
Impressive completion of a broad scope of work in compliance with the highest standards
High quality of the printed drawings in any file format
High accuracy of element dimensions with their corresponding annotations
Tools used
1
Autodesk Revit
view project view more view photos